…or: the basics of save file reverse engineering. For this semi-practical example, I will be demonstrating how to find values, structures, and save them in Midnight Club LA, for Xbox 360. This guide assumes:
- your computer is using Windows
- you are competent with development tools
- you know what endianness is
- ..and you have a basic understanding of computer memory.
Testing Environment
Let’s face it, these following steps are completely insane for anyone that respects their time:
- Export the save data of your game from your physical console, using either software on your computer (and a wire) or the in-console utilities (and a USB flash drive).
- Load the data and modify it.
- Write the data back to the device
- Load the game
- and watch it crash
- Rinse and repeat
Instead of this labourious old process, we now live in the future. So let’s speedrun this bitch.
PLEASE NOTE THAT THE FOLLOWING IS PROBABLY ILLEGAL WHEREVER YOU LIVE, AND ALL OF THIS WAS DONE IN MINECRAFT FOR EDUCATIONAL PURPOSES ( ͡° ͜ʖ ͡°)
1. Download Xenia, or Xenia Canary – In my experience there’s more stability on Xenia Canary, but both work fine.
2. Obtain a legitimate copy of the game you want to play with. In my case it is Midnight Club: Los Angeles. This should be a .iso file, of the game disc. Do not bother trying to extract this file unless you have the correct toolset (I’ll cover this process, and the stuff required, at a later date.)
3. Verify the file you have is working;
- Open
xenia.exeorxenia_canary.exe, ensure this doesn’t immediately crash. - Select File -> Open, or press
CTRL + Oto browse for your ISO file. Open it. - If all is well, you should see the game load, like below.

4. Play the game for a bit, until you can verify there is a save file being generated.
Xenia allows you to view the location of its game storage by clicking “File -> Show content directory…”. When a game is loaded this will automatically open the folder designated specifically for the game you have loaded.
For MCLA, we can check for the initial save by looking for this file: <storage location>/00000001/mc4.sav/mc4.sav. This file is written on every save event in game – the easiest way to get this to happen is to go to the garage and then immediately leave.

5. Back up the game save!! Initially I made the mistake of skipping this basic process when figuring these mods out – and learned quickly that having to complete the first mission multiple times to re-generate a “safe” save file is not fun. Ensure you name the file something useful, i.e. mc4.sav-backup. This will absolutely come in handy later. Also, don’t save the file within the mc4.sav folder: the game will overwrite everything and consequently delete the backup.
Digging into the data
The first step to hacking our save file is to take a note of some interesting data you would like to manipulate, from in-game. If you’ve ever used Cheat-Engine to make fun things happen in real time, the following steps will be fairly familiar.
For this demo, I noted the values of my characters money, reputation, and the number plate of my vehicle. I am already using a modded save here, so parden the balooned values. The principles we’ll use to change the values will still be the same.
| Name | Value |
| Money | $99,985,299 |
| Rep | 1,000,249 |
| Vehicle plate | 2AFP445 |
Here’s the complex bit: the following tools are recommended to be downloaded before continuing.
- Visual Studio Code, and the Hexdiff extension. For now you could just use any hexadecimal diff explorer, but this is the simplest to work with in my opinion.
- ImHex – This is a hex editor with a neat built-in C-style struct builder for helping reverse engineer classes from raw binary. For now we’ll be focusing on the search & replacement utilities it offers (along with the nice interface)
Install these and get comfortable with the interface and where everything resides. VSCode is fairly easy and plenty of guides are readily available online to get used to it, ImHex has some pretty docs centralised to this URL: https://docs.werwolv.net/imhex. Please do read about the Hex Editor and Data Inspector utils before continuing.
Now that we have a nice backed up save file, and know what the values in the file are – let’s change them.
CASH
Spend some of that hard earned cash in game. I bought a ’88 VW Scirocco and observed my new money amount.

PLATE
Select your first vehicle, of which has the number plate you noted earlier. Customise the vehicle and change the number plate, do not use special characters or spaces as this adds complexity – i.e. the space character is represented as 0x3E (>), which is just annoying. Take a note of the new value – this will always be a seven character string.

REP
Rep is a bit more annoying. You need to complete a race and earn some rep to change the value. Because I am lazy and it is late, I will not be doing this. If you’re this far into the task so far, your homework is to figure out how to get this value to change on your own, based on the ones I will focus on.
THE RESULT
| Name | Old Value | New Value |
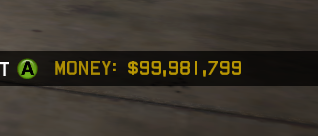
| Money | $99,985,299 | $99,981,799 |
| Plate | 2AFP445 | VMEX1TX |
| Rep | 1,000,249 | … 🙂 |
Using Hexdiff & ImHex
Now we have a template to check for changes (our original mc4.sav-backup), and our new file (which should be exported in the same manner as before – named mc4.sav) Don’t bother changing the name of the new file as we’ll be loading this into the game when we’ve messed around with it.
Open VSCode, and navigate to File, then “Add Folder to Workspace…”. Navigate to the folder you are storing your save files in.
Assuming the installation of the Hexdiff extension is successful, highlighting both of the files in this folder using CTRL + Left Click will allow you to right click and select “Compare Selected(Hexdiff)”. Ensure you select the old file first, then the new one – this is explained in a moment.
Click this oddly formatted button:

Something like the following will present itself, if all is well.

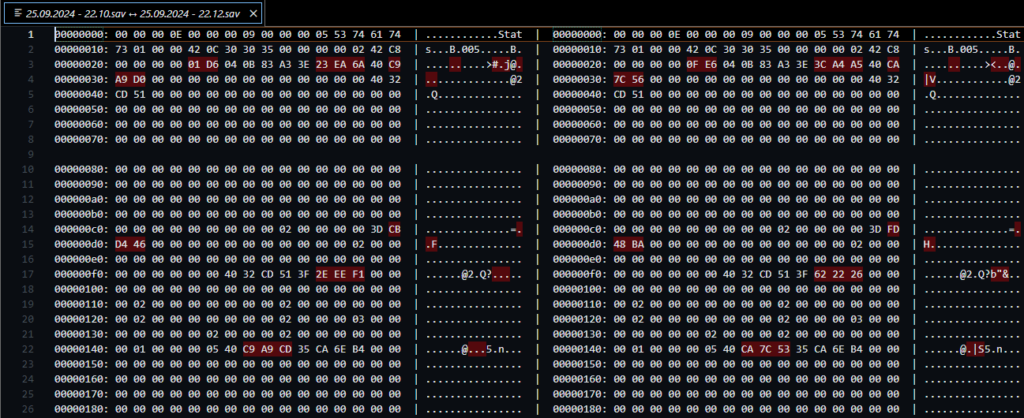
This may be overwhelming if you have never worked with binary files, but this is rather simple. The red-highlighted word groups (16bits) are mapped between the left and right side, separated by the pipe (|) character. The left side is the file you clicked first, which should be the old save file, and the right side is the new one (containing our logged changes). Given we read left-to-right and the common way of thinking is “left first right second”, this helps us mentally understand what we’re looking at.
Notice first that there are more changes in the file than you made in game. There are numerous reasons even beyond my understanding of the engine that this happens, but this doesn’t matter. Do a simple file search on the opened diff display for the new number plate. You will probably not see the value immediately if the file structure is the same as I have – remove some characters from the start of the search and see if anything displays, and do the same for the end in the case nothing is showing still. You should now have one result, which is highlighting the location of the string in the file.

okay it’s super late so I will leave this post here for now. this is to be continued. you can probably see where this is going already, but do note that there are some caveats to directly modifying the values in the file.
aaaaand… for some archiving purposes: here’s a HexDiff struct that can set your money & rep to the max 32 bit int, if that’s wut u are wanting to achieve. more to come.
#pragma endian big
#pragma allow_edits

import std.io;

struct Vehicle {
    padding[0x4f];
    float m_neon_colour[3];
    float m_unknown[2];
    padding[0x1F54 - 0x8];

    char m_model[0x0E];
    padding[0x12];
    char m_menu_name[0x0C];
    padding[0x15];
};

struct CareerStat {
    char Name[24];
    u32 Values1[6];
};

struct ProgressionVar {
    u32 Values0[4];

    char Name[15];
    u32 Values1[8];

    padding[2];
};

struct StatsStorage {
    u32 Index;
    char StoreName[7];
    //padding[12];
    u32 size;
    padding[9];
    CareerStat CareerStats[15];
    ProgressionVar Progress[43];
    padding[8];
    ProgressionVar Unlocking[13];
    padding[20];
    ProgressionVar Exotics0[5];
    padding[8];
    ProgressionVar Exotics1[5];
    padding[8];
    ProgressionVar Tuner[5];
    padding[8];
    ProgressionVar SportBike[3];
    padding[8];
    ProgressionVar Muscle[5];
    padding[16];
    ProgressionVar Exotics2[5];
    padding[8];
    ProgressionVar Luxury[5];
    padding[12];
    ProgressionVar Pulse[2];
    padding[8];
    ProgressionVar Roar[2];
    padding[8];
    ProgressionVar Agro[2];
    padding[8];
    ProgressionVar Zone[2];
};

Vehicle Vehicles[32] @ 0x4785;

StatsStorage Career @ 0x50CDC;

// Sets money
Career.Progress[0].Values0[0] = 2147483647;

// Sets rep
Career.Progress[0].Values0[2] = 2147483647;


struct Store {
    u32 Index;
    char Name[14];
    u32 Size1;
    u32 Size2;
    u32 Size3;
};

struct File {
    Store store0;
    padding[this.store0.Size1 - 8];
    Store store1;
};


Store storeone @0x0;
File File @ 0x0;